Adding CAPA Teams to New Groups
If additional groups are configured for CAPA team policies, ensure that you add all of the tasks listed in the example below to your group:
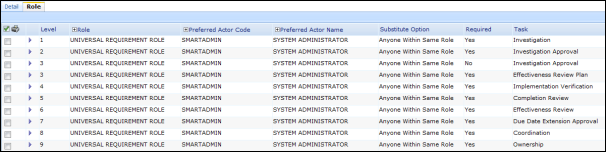
Adhere to the following guidelines when editing the default CAPA team to avoid negative impacts on the CAPA Management workflow:
- Make sure all tasks above are listed in the new team.
- Make sure all required options are checked as seen above.
- Only additional approval tasks should be added to the Team.
- From the SmartSolve Portal Page, click the Home tab.
- In the Setup and Policy section, click Setup.
- In the System Wide section, click Group.
Result: The Groups window is displayed. - Click the
 for the default CAPA team.
 - Click Role.
Result: The default CAPA team's Role tab is displayed. - Check the check box of the role to be edited. Click Action > Edit.
Result: The Role entry window is displayed.
- Skip the Level field.
- Enter or zoom and select a role. Only actors with this role can be entered.
- Enter or zoom and select a preferred actor.
- Click the drop down button and select the substitute option. If you select None, then only this assigned actor can sign-off.
- Skip the Required field. Checking or unchecking this option at this time could create issues in the workflow later.
- Click the Save button.
Result: The new team member has been added to the list in the Group window.
See Also